Low-Budget Kitchen Reno Part 2

Your kitchen cabinets transformed in 1 afternoon.
Well Part 2 of my Low-Budget Kitchen Reno is finally complete and guys…I have never been more excited to share a blog post!!
This one’s for all the apartment renters out there…and for anyone else who’s been in misery over their shabby, outdated kitchen because they don’t have the time or budget to give it the proper overhaul that it needs. Let’s face it…when it comes to making big changes to your living space the struggle can be very real, especially if you’re a renter. But as you will see…making big, impactful changes doesn't mean that you have to break the bank, the secret is to get creative.
In part 1 of this series Low-Budget Kitchen Reno Pt. 1: Say Goodbye To Those Tacky Tiles I showed you how I transformed the backsplash in the kitchen of my rented apartment in 1 afternoon (remember those hideous brown tiles?), with NO sanding or scraping, for less than $100. Taking those tiles from drab brown to white was major and you wouldn’t believe how much that small change brightened up the space. But of course, once the tiles were painted and looking SO fine…it became glaringly obvious that the cupboards were in desperate need of some love too.

After hours of searching kitchen cabinets colour inspo on Pinterest , I decided that I would paint the top cabinets with the left over white paint from the tile project and pick a blue paint as an accent colour for the bottom. Important to mention here that the cabinets in my kitchen are your run of the mill, cheepo, composite board cabinets. So while I had dreamed of just painting over them for years…doing so wasn’t a realistic option until I found this LIFE CHANGING paint from Behr at The Home Depot (more on that below).

Here’s how I did it:

You will need -
*T.S.P All Purpose Heavy Duty Cleaner
*Zinsser B-I-N Shellac Base Primer
*Behr Alkyd Semi-Gloss Enamel Paint (2x if you want to do 2 different colours on your cabinets)
*Oil Based Paint Brush
*Latex based paint brush
*Bennett Extra High Density Foam Roller Kit
*1 heavy duty scrubbing pad sponge
*rubber gloves

The can on the right is the Behr Alkyd Semi Gloss in Watery - the can on the left is the left over Behr Alkyd Satin Melamine Finish in White that was left over from the tile project.
Directions -
1) Mix T.S.P powder with water as per package instructions. Put on gloves (this stuff is HEAVY duty), soak sponge in solution and scrub cabinets very well, to remove all dirt, oil and debris. Once all cabinets are clean, let air dry or wipe down with paper towel.
2) Pour B-I-N into disposable paint tray (or coat paint tray in tin foil and dispose of it afterwards).
3) Apply 1 generous coat of B-I-N primer to cabinets - use oil based brush to get BIN in corners and grooves, use roller to cover the cabinet surface evenly. B-I-N dries completely in 30 minutes.

The cabinets with 1 coat of B-I-N
4) Once finished priming, discard the foam roller and oil based paint brush (unless you have mineral spirits to clean the oil paint off). Discard the disposable paint try and/or the aluminum foil.
5) Cabinets are now ready for Behr Alkyd paint. This paint is AMAZING because it combines the performance and durability of an oil-based paint with ease and convenience of a water-based paint. Pour the Behr paint into the paint tray and repeat the same process by using the latex brush to get enamel paint into corners and tile grooves. Roll paint over brush marks to achieve a smooth, line free surface. Make your way across the cabinets rolling on the first coat.

Top cabinets with first coat of White Melamine Finish Paint
6) Let dry for 2-4 hours and apply the second coat. Clean brush and foam roller with soap and water - they are good to use a second time if cleaned properly.
7) Once second coat is applied, let set for 7 days before rinsing or cleaning the surface with a mild non-abrasive cleaner. This stuff dries hard overtop of the B-I-N coat and has incredible strain repellence - making it the perfect choice for a kitchen cabinets.
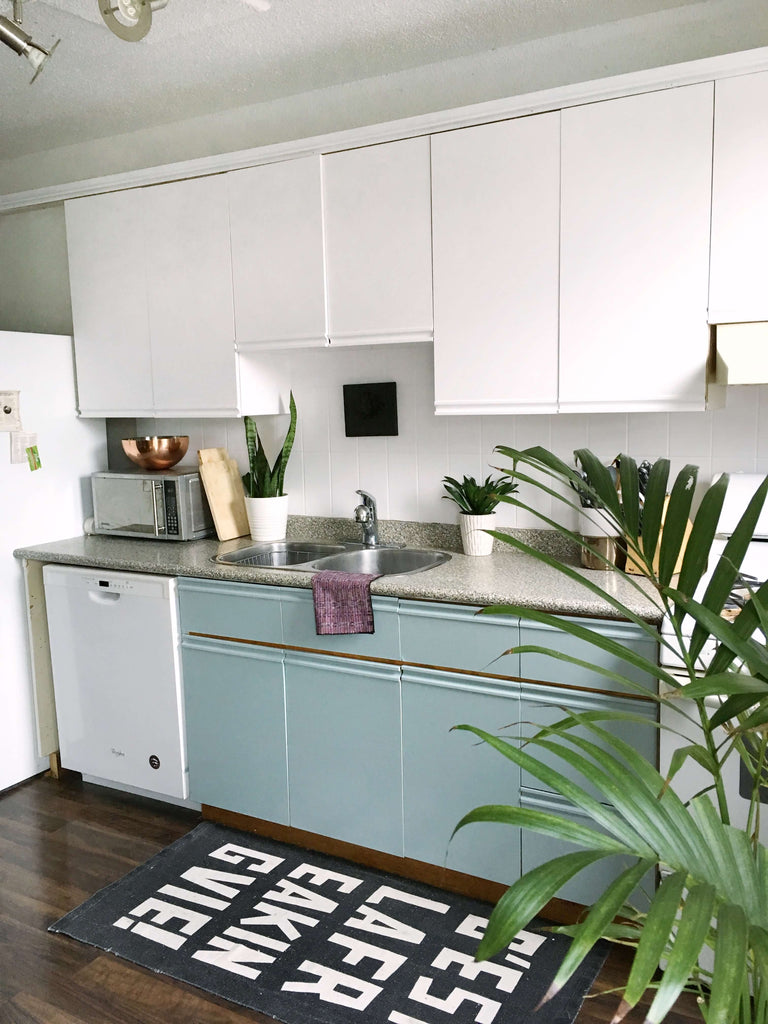
✨ The Reveal ✨

VOILA!!


To say that I was happy with the end result would be a massive understatement. I can’t believe that I get to live in this beautiful space now! 💕
Finished Project Recap
- Total time spent to complete project: 2 days
- Total cost of project: $102.47


Loving the transformation?? Let me know in the comments below + fire away if you have any questions about starting a Low-Budget Reno in your own kitchen 🙌🏻
Back To ALL BLOGS