Hi everyone! Wow - am I ever excited to share this new tutorial with you guys!! Lemme tell you I love a good DIY…and with COVID-19 currently limiting our options for entertainment this summer, I started looking around for something creative that I could share with you to try at home. Scrolling around on Pinterest one afternoon, I stumbled on a tutorial for Ice Dying. I tried it for the first time last week and now it’s become my new favourite thing EVER. What I loved the most about ice dying is that unlike the traditional tie-dye method (tie & bind), it lets you achieve a stunning watercolour look. The process is so fun and easy and best of all, the ice does all the work for you so you don’t have to have any prior experience with fabric dying to create something gorgeous. I only used 4 powder dyes in my trial but as the ice melted and mixed the dyes, a whole spectrum of new colours emerged. The resulting pattern was a wonderful surprise and looks like a bright and colourful one-of-a-kind piece of art.
WHAT YOU'LL NEED FOR THIS DIY
1 set of standard size, white cotton pillow cases 60g sodium carbonate non-iodized salt 4L warm water 4 tbsp reactive powder dye metal cooling rack plastic or metal tub rubber gloves disposable spoons 5 lb bag of crushed ice
The most important part of the whole process is prepping your fabric. For this tutorial I chose a set of white, 100% cotton pillow cases - you can pick anything of similar size, just make sure that it’s white and 100% cotton. First, pre-wash your fabric with a textile detergent to remove any fabric softeners or residues that might have been applied to the fabric during manufacturing. Next, combine the sodium carbonate with 4L of warm water and stir until dissolved (the sodium carbonate is a mild irritant so make sure that you are wearing your rubber gloves while handing it). Once the chemical soak is prepared, add your fabric and let sit for at least 30 minutes. Treating your fabric with a chemical soak will help the dye adhere and also prevent bleeding or fading. Remove your fabric from the chemical soak and squeeze out any excess liquid. Transfer leftover solution to an air-tight container and reserve for future dye projects.
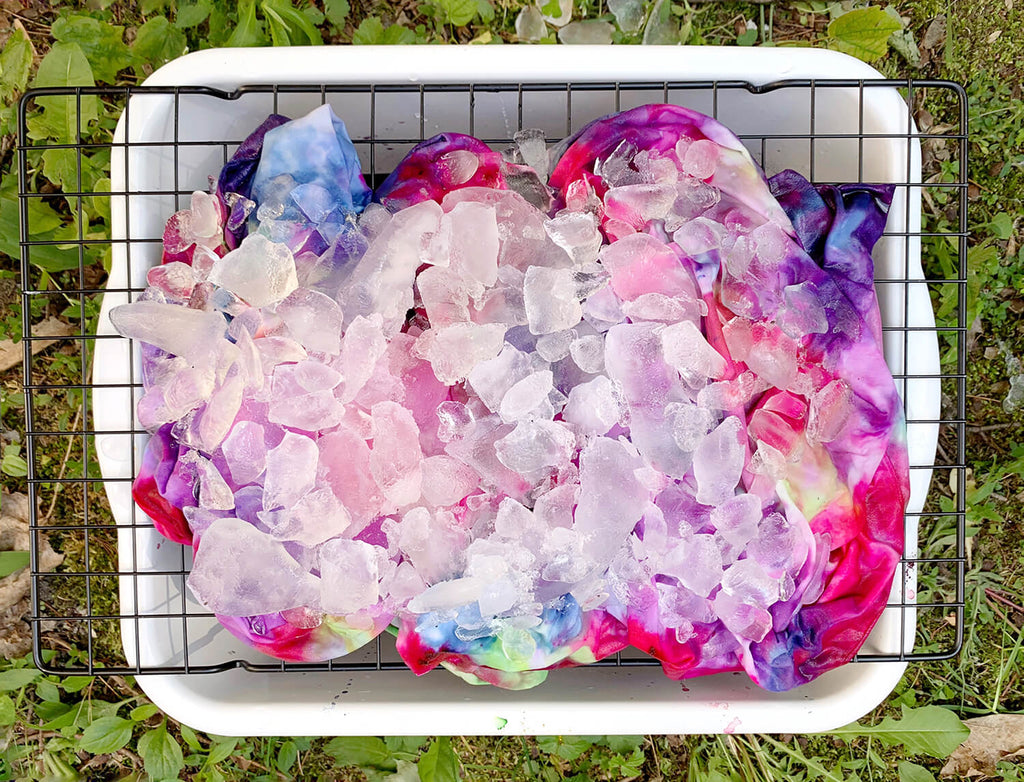
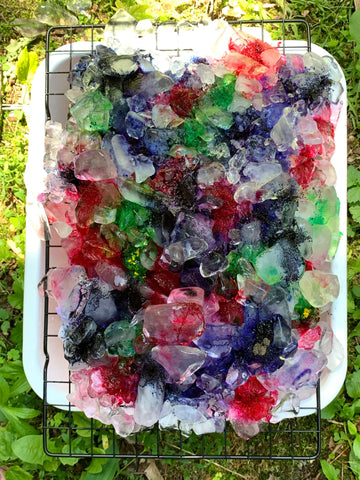
Next we’re going to head outdoors to cover our fabric in ice and apply the dyes. You’ll want to set up your tub and cooling rack somewhere you don’t mind a little dye dripping - a nice patch of grass works great and if it’s a warm day you don’t need to be in direct sunlight. Set your rack over the empty tub and then scrunch up your wet fabric and place it on top of the rack. Pile the crushed ice over the fabric, making sure that it’s completely covered.
Now…it’s worth noting that the key to the magic of this method is that we’re going to be using high qualitypowder reactive dyes. Don’t attempt this tutorial with liquid dyes - you’ll end up with an over saturated, blotchy mess. Pick 3-4 powder dye colours (remember: as the dye melts with the ice it’s going to create a whole rainbow of new colours) and using a spoon, start sprinkling the dyes on 1 by 1. Fibre reactive dyes are super concentrated and as you start sprinkling your dye, you’ll be absolutely amazed at how far a little tiny bit stretches. Apply the first dye colour to the ice in a few spread-out patches. Wipe off the spoon and repeat the process with the second dye.
See how the base colour of the yellow dye is already starting to split and make new colours? Magic!!
Apply your 3rd and 4th colours and keep sprinkling until you are happy with the amount of coverage you have on the ice. The more dye you apply, the bolder the pattern. Next time I do this I think I might actually try pulling back on the amount of dye I use and adding more white space (areas with no dye).
Now that all of your colours have been applied, it’s time to let the whole thing sit and wait for the ice to melt (depending on the temperature, this could take a few hours).
Important: although it may be tempting, DO NOT touch your fabric until all the ice is completely melted. It might seem crazy to think that the underside and the middle are getting exposed to the colour, but they are. As the ice melts it carries the dye all the way through the fabric even though it’s scrunched.
See it for yourself in the video below!
Voila!! Once the ice has melted your fabric is ready for a good long rinse under cold water to remove any excess dye. I threw my pillow cases on a quick cold wash and tumbled dry to make sure that the colours got locked in and that they wouldn’t transfer onto any of the other bedding.
Don’t they look like a gorgeous, watercolour Spring garden?! Pretty good for a first try! Every square inch of these pillow cases has a different mix of colour and pattern and I could sit for hours just looking at all the unique colour combinations.
Want to try out this fun DIY at home? Grab one of our new DIY Ice Dye Kits. 💕
Tutorial by Ebb & Flow; photography & video by Devon Specht